
Last month, with the sudden appearance of the M3 MacBook Air, I purchased a new Mac for the first time in several years.
Since I’m setting up my brand new MacBook Air from scratch, I decided to summarize the initial settings I make for the benefit of Mac beginners and those using a Mac for the first time.
For me, who has been using Macs for many years, each of these settings is essential for a comfortable Mac life. Without them, using a PC would be so stressful.
I have been using MacBook Air, MacBook Pro, Mac mini, etc. for over 10 years since my university days. During graduate school, I used Macs for programming and machine learning, and in my personal life, I use them for editing photos and videos shot with mirrorless cameras using Adobe Lightroom and Premier Pro. I would be considered a heavy user by general standards.
While preferences may vary from person to person, I hope you will consider these as recommended settings from a heavy user.
Recommended Settings to Make Mac’s Divine Trackpad Even More Comfortable
One of the major advantages of using a MacBook Air/Pro is the ultra-high-performance trackpad that outperforms other PC manufacturers.
When working on a Windows laptop, I feel stressed without a mouse, but with a Mac, two-finger scrolling, gestures with swipes, pinch-to-zoom, etc. work so smoothly that I don’t feel much stress even with just the trackpad.
To make this essential trackpad even more comfortable to use, I highly recommend changing just the following two settings.
The two items that must be changed during setup are:
- Increase “Tracking speed”
- Enable “Tap to click”
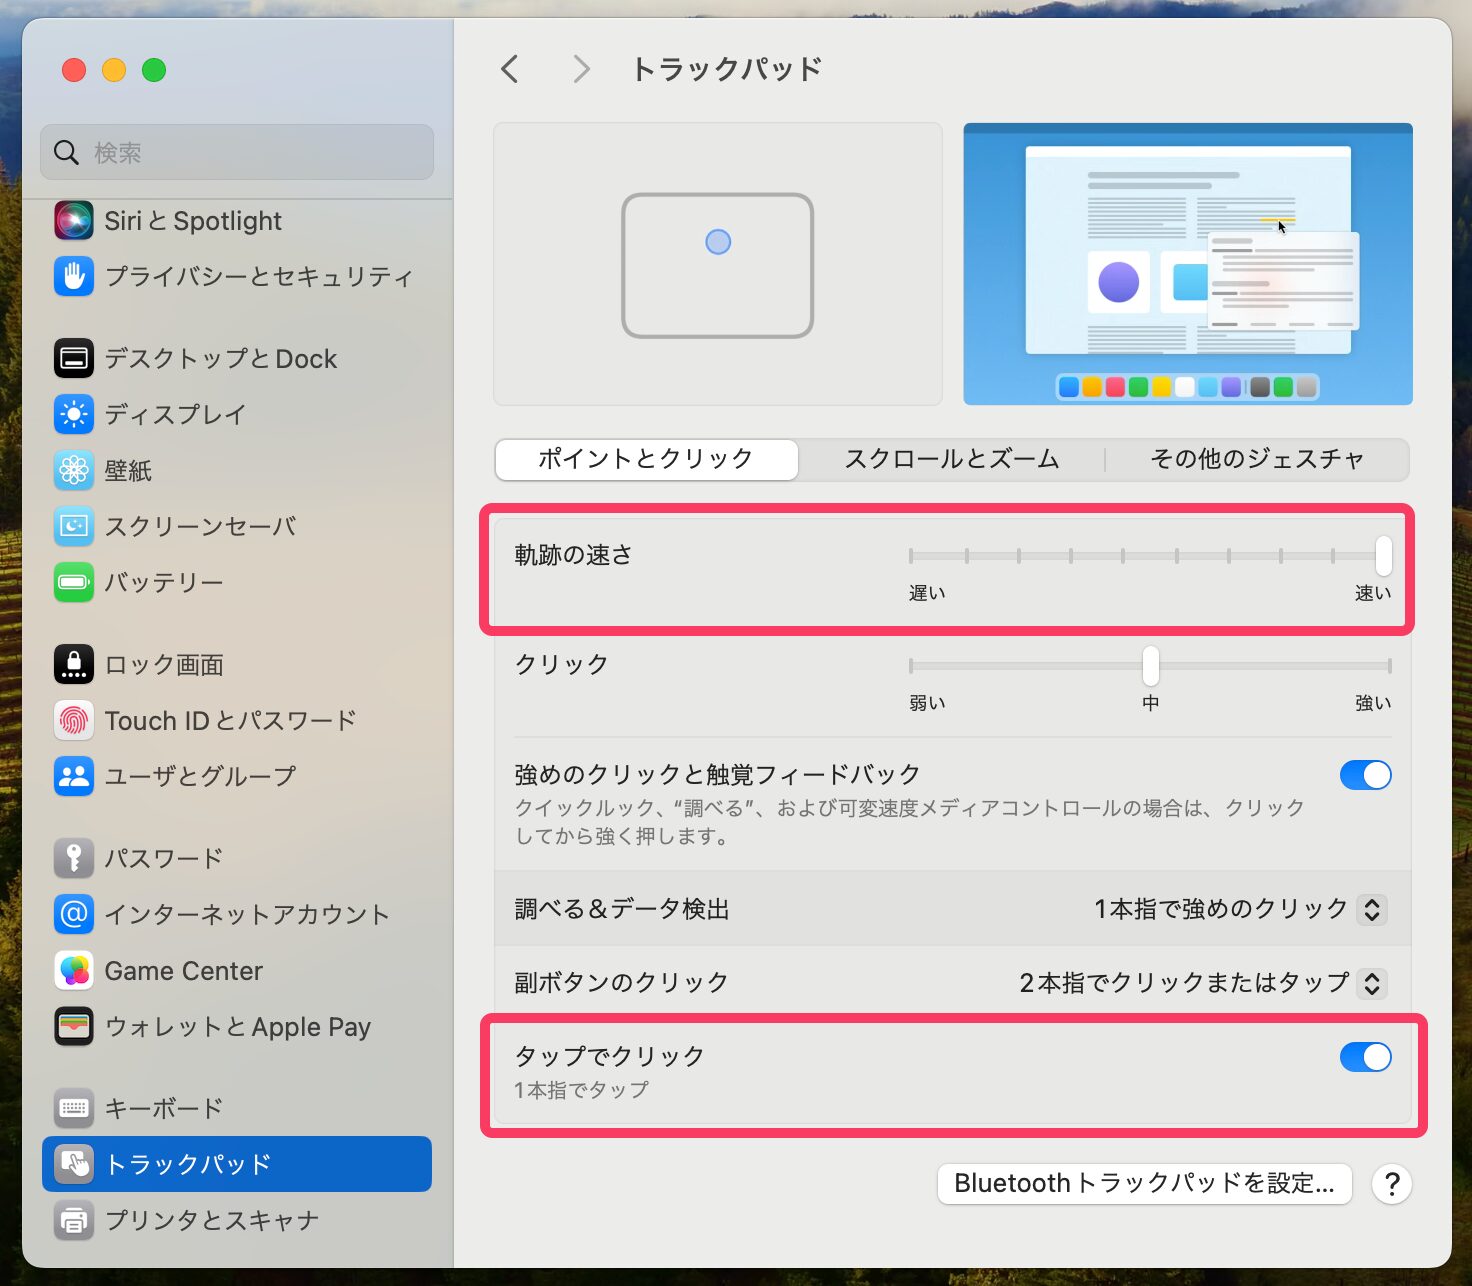
Trackpad “Tracking speed”
“Tracking speed” controls how fast the cursor moves on the screen.
The faster you make the cursor, the more space you can move with less finger movement distance.
This makes it possible to move across the screen in one stroke without having to reposition your finger on the trackpad multiple times to move from edge to edge of the screen, which greatly affects fatigue.
Just tap the trackpad to click
“Tap to click” is also an essential feature that I find strange is not turned on by default.
Instead of pressing your finger down hard to click, you can click just by touching the trackpad like a smartphone.
This reduces the strain on your fingers when using the trackpad, and also eliminates the clicking sound that others can hear.
You may think that turning on tap to click will cause you to accidentally click here and there, but that concern is mostly unnecessary.
Mac’s trackpad is so highly precise that, strangely enough, putting your fingertip on the trackpad to move the cursor is not recognized as a click, and it only becomes a click when you tap with the intention of clicking.
I don’t know what technology is used to distinguish this, but in any case, it works great without any discomfort, so I want you to try turning it on once.
Essential Settings to Reduce Fatigue When Using a Mouse
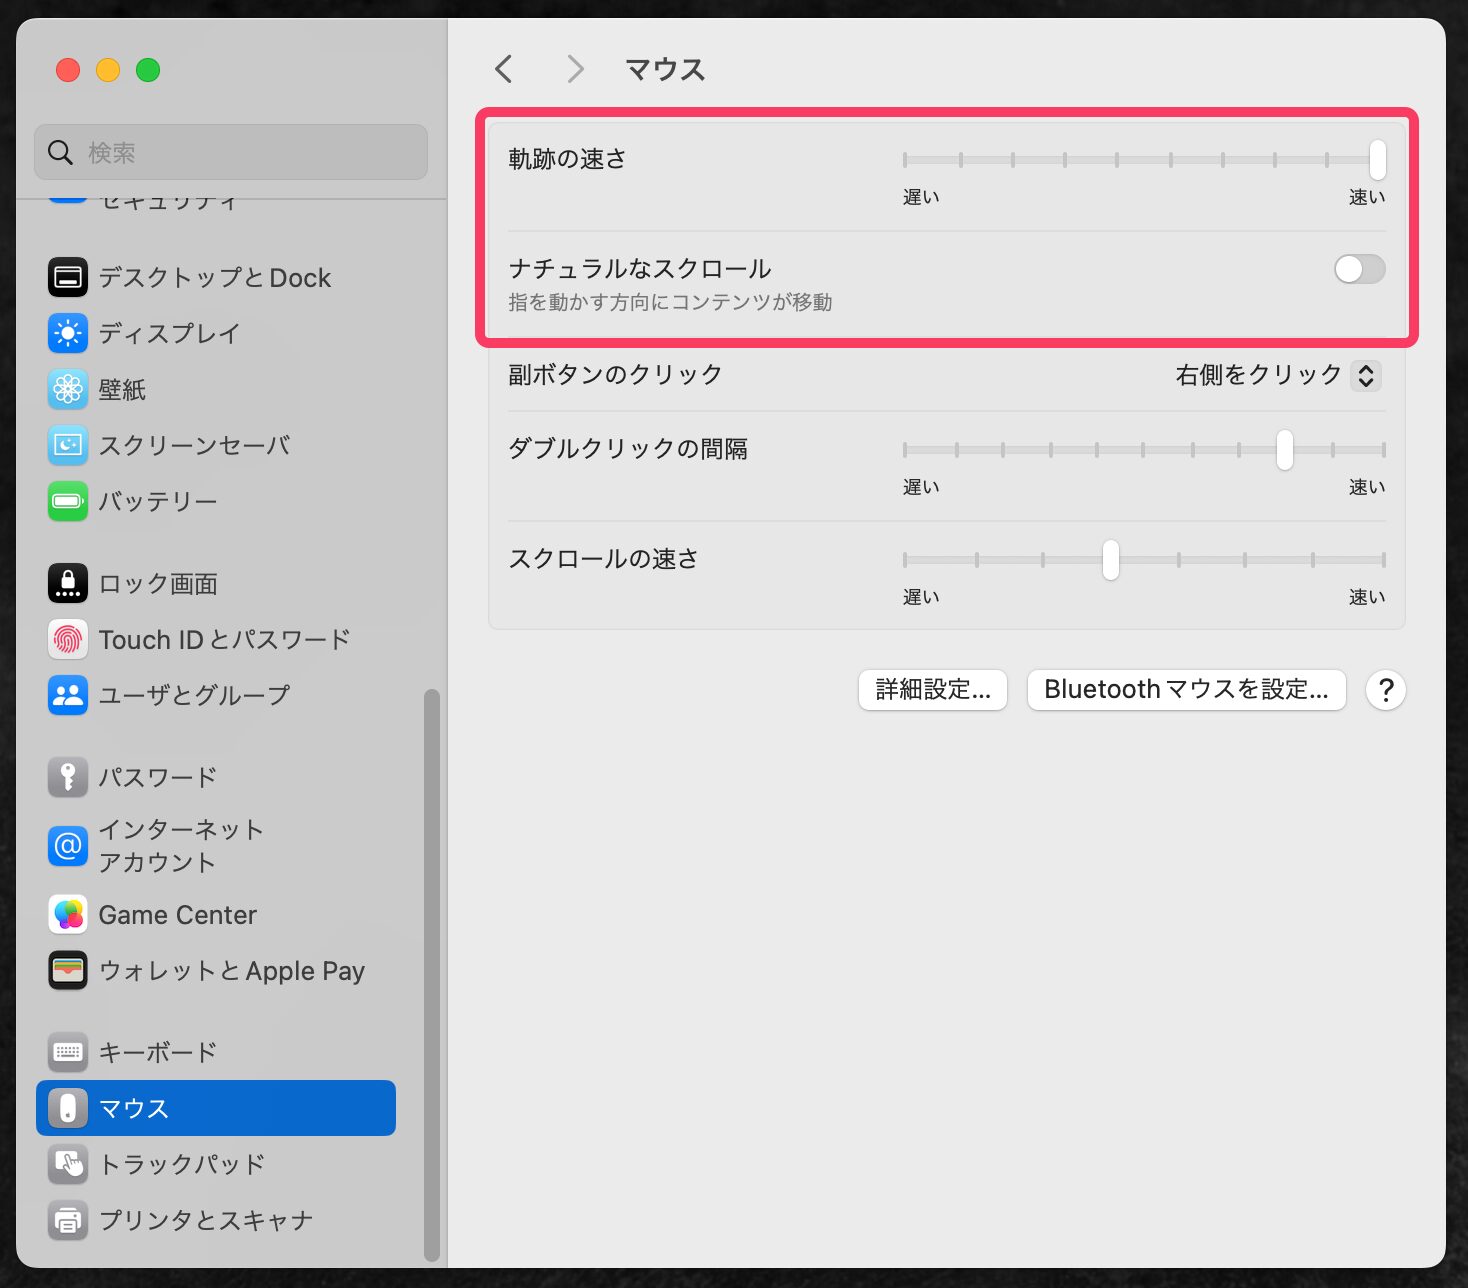
“Tracking speed” when using a mouse
Similar to the trackpad, for those who also use a mouse, I recommend increasing the “tracking speed” of the mouse as well.
There is a separate setting item from the trackpad, so adjust the trackpad and mouse to your preferred speed. Once you get used to it, maximum speed should not be a problem.
Being able to move across the entire screen with a small movement distance dramatically reduces arm fatigue when using a mouse.
If you work on a computer all day, you may be suffering from wrist fatigue or carpal tunnel syndrome due to your mouse and keyboard.
Before going so far as to purchase a high-performance mouse or trackball mouse to reduce arm and hand fatigue, changing the tracking speed is an absolute must-try setting.
Greatly Expand Your Workspace Even on a MacBook with Display Settings!
Resolution settings that greatly change your workspace
If you purchased a 13-inch MacBook Air or a 14-inch MacBook Pro, your screen workspace is limited compared to the 15/16-inch models.
Especially in the default state of a Mac right after purchase, the font size is set quite large, so when you have multiple windows open such as a browser, Word, and a messenger, you may feel that there is not nearly enough space.
In fact, even with the same screen size, there is a way to greatly increase the amount of windows and text displayed on the screen.
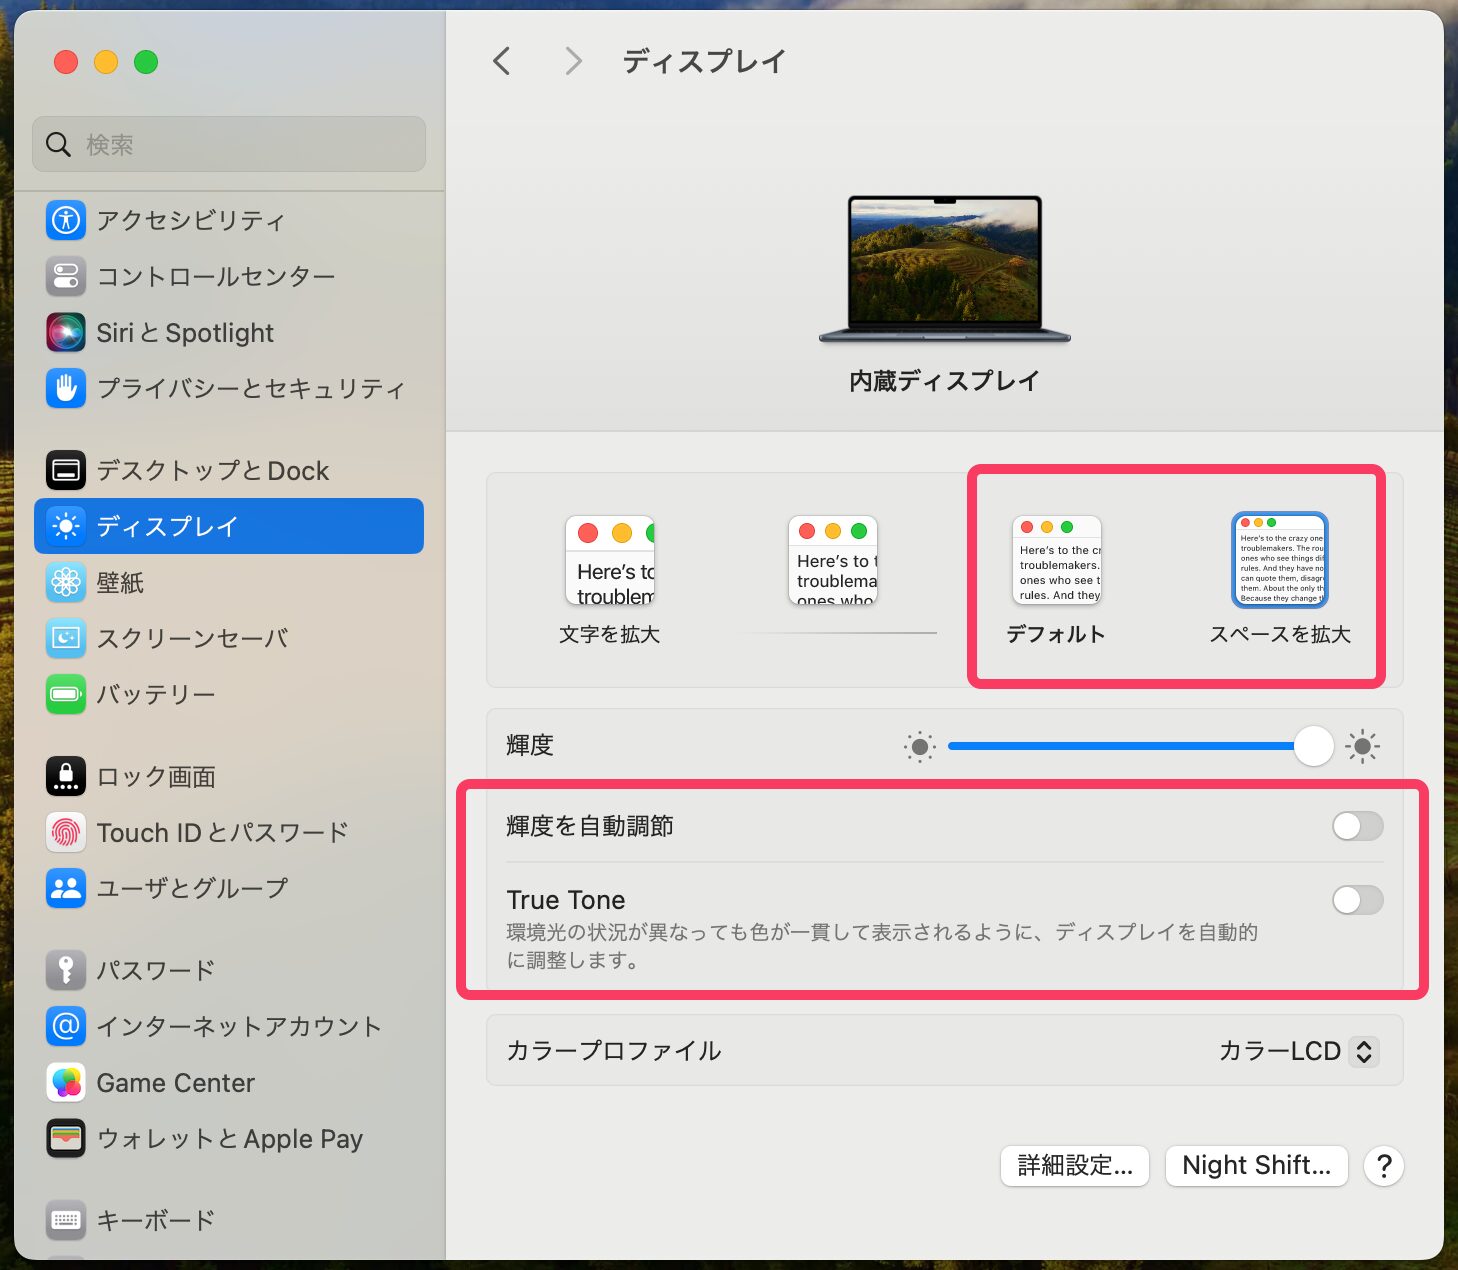
Open “Displays” from the settings, and in the resolution settings, select the “More Space” option with the smallest text. You will immediately feel the screen space expand significantly.
Stop the screen color and brightness from changing on their own
By default, the Mac automatically darkens or brightens the screen and makes the screen brownish or bluish depending on the brightness of the environment.
This is due to a feature called “True Tone” that tries to adjust the screen to look the same color regardless of the environment around the Mac, but honestly, it feels quite annoying.
The screen automatically darkens when you enter a shaded area even though it’s not night, or you forget that the screen has turned brown with True Tone and check photos you took, unable to check the original colors. It’s very stressful, so I turn it off.
When watching videos or movies, you should also turn off True Tone so that you can view them in their original colors.
Since you can easily brighten or darken the display with the function keys on the MacBook keyboard, even with these features off, you can just change the brightness with the keyboard only when you really want the screen to be darker.
Recommended Dock Settings for a Cleaner Look and Improved Usability
Especially for those switching from Windows to Mac, the Dock displayed at the bottom of the Mac screen may be a refreshing change.
Since it occupies a relatively large space at the bottom of the screen, customizing the Dock for better usability and appearance can greatly affect the overall user experience on a Mac.
While Dock customization largely depends on individual preferences, I would like to introduce my recommended settings.
Hide the Dock to Prevent It from Invading Your Workspace
Particularly on laptops like the MacBook Air or MacBook Pro, where screen workspace is limited, it is a waste to have the Dock occupy several centimeters at the bottom of the screen.
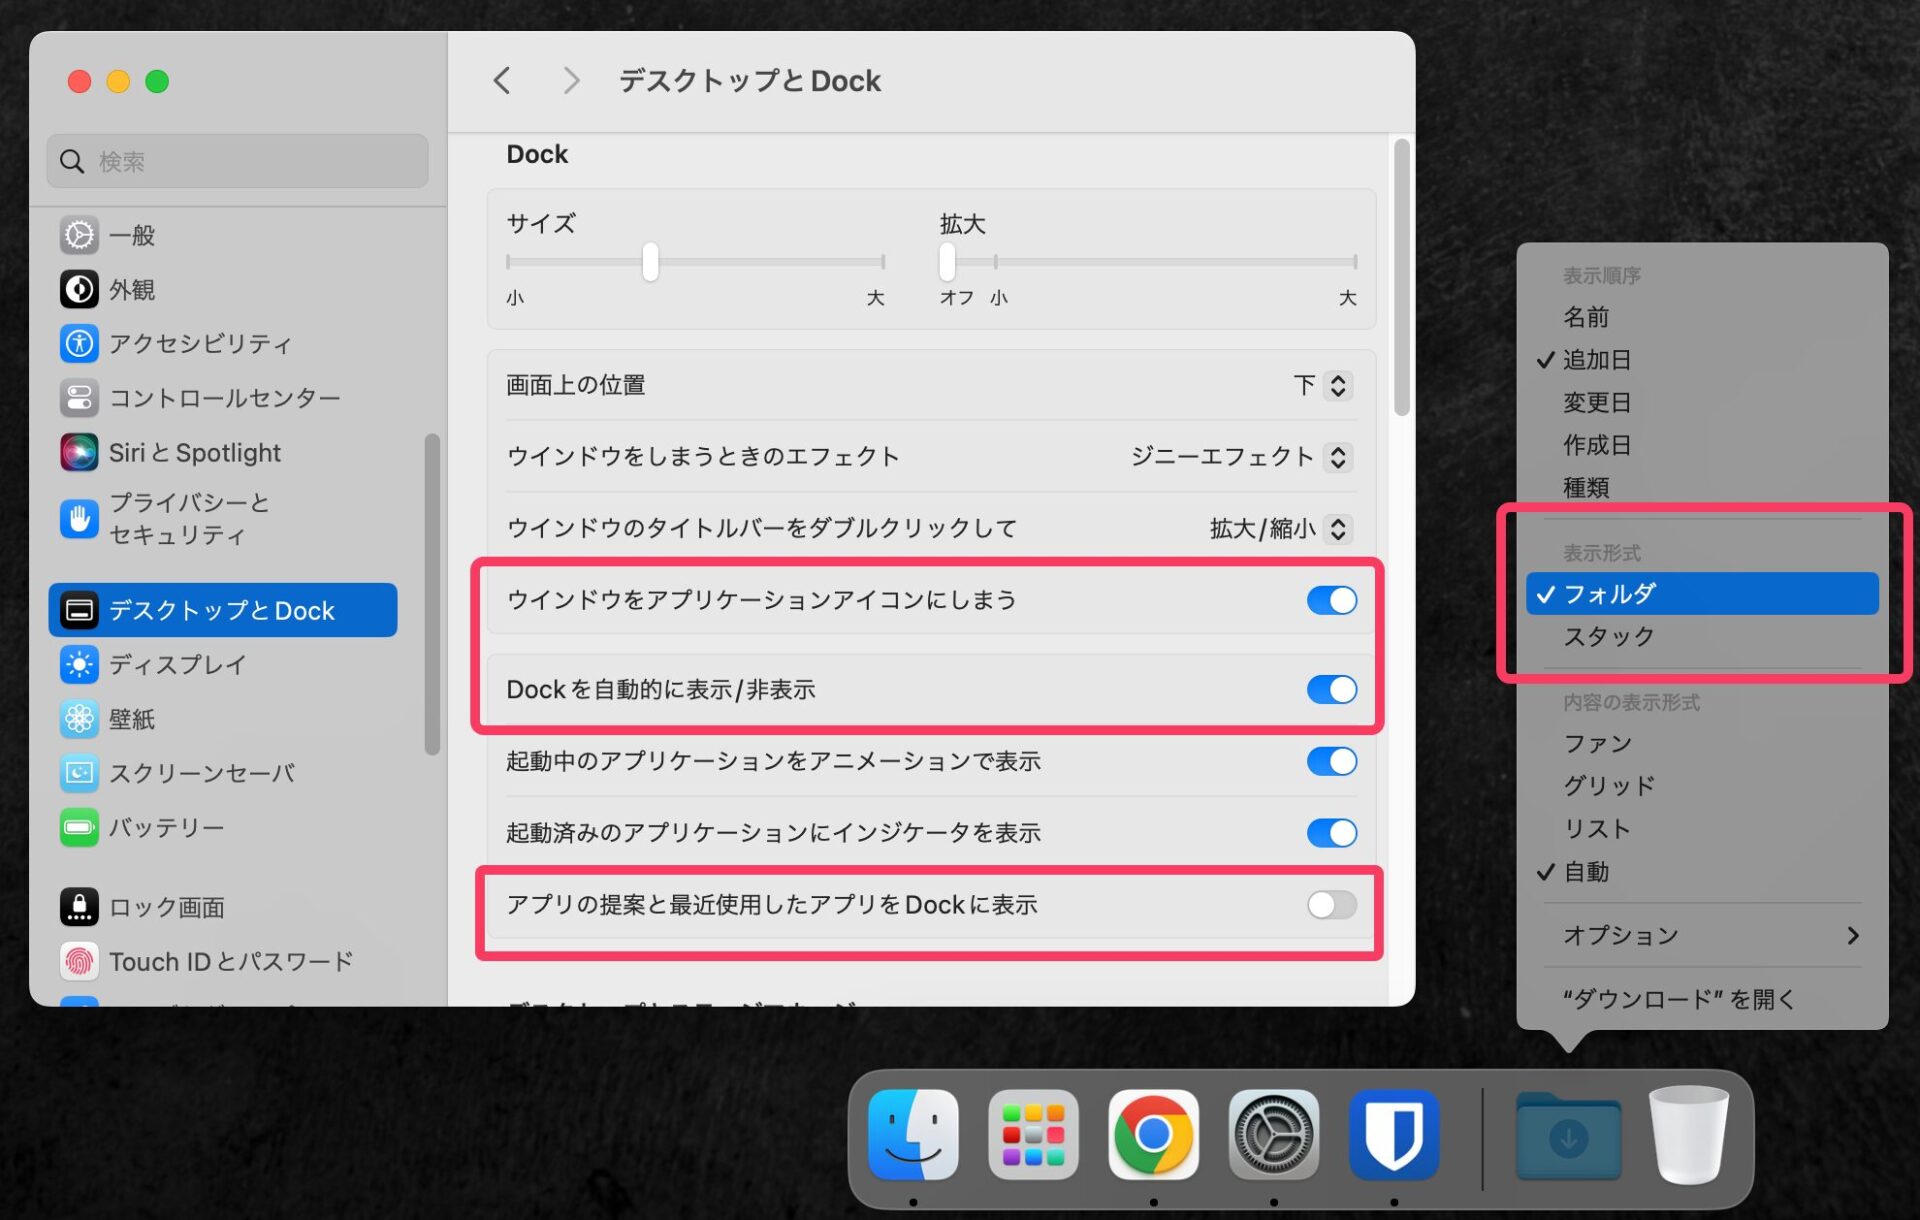
By enabling “Automatically hide and show the Dock,” the Dock will hide off-screen when not in use.
This allows you to maximize windows and work with the full screen, making the most of the limited screen real estate on laptops.
Keep the Dock’s Appearance Consistent
When “Show recent applications in Dock” is enabled, recently used apps will appear on the right side of the Dock.
Frequently used apps should be added to the Dock anyway, and personally, I find it unpleasant to have apps automatically added to the Dock just because I used them recently.
I dislike having the app icons displayed in the Dock change every time I show it, so I keep “Show recent applications in Dock” turned off.
Hide the Contents of Folders
By default, the Trash icon and a shortcut to the Downloads folder are displayed in the bottom-right corner of the Dock.
Adding frequently used folders like “Documents” here, not just “Downloads,” can be quite convenient.
However, by default, when you add a folder to the Dock, it uses the “Stack” mode, which displays the files inside the folder in a stacked manner.
This can also lead to unsightly clutter, with images being visible when downloaded or unappealing icons of .dmg or .zip files being automatically displayed.
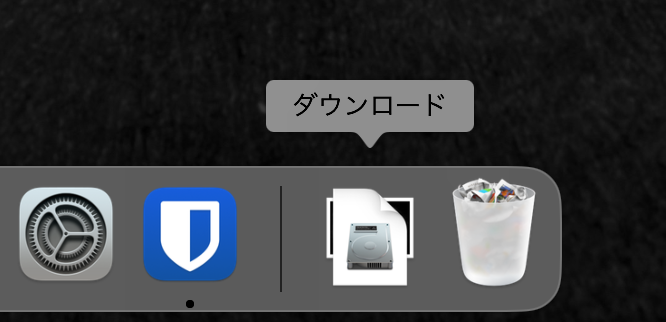
By right-clicking on the “Downloads” folder, you can change the display style. For those who don’t like the “Stack” style, I recommend changing the setting to display it in “Folder” style.
Essential Finder Settings You Should Configure
The equivalent of Windows’ File Explorer on Mac is Finder. It serves as the main tool for accessing folders and files.
Finder also offers various customization options, and it’s recommended to tailor it to your preferences for better usability. Here, I will introduce the settings I recommend configuring first when you get a new Mac.
Prevent Unnecessary Icons from Appearing on the Desktop
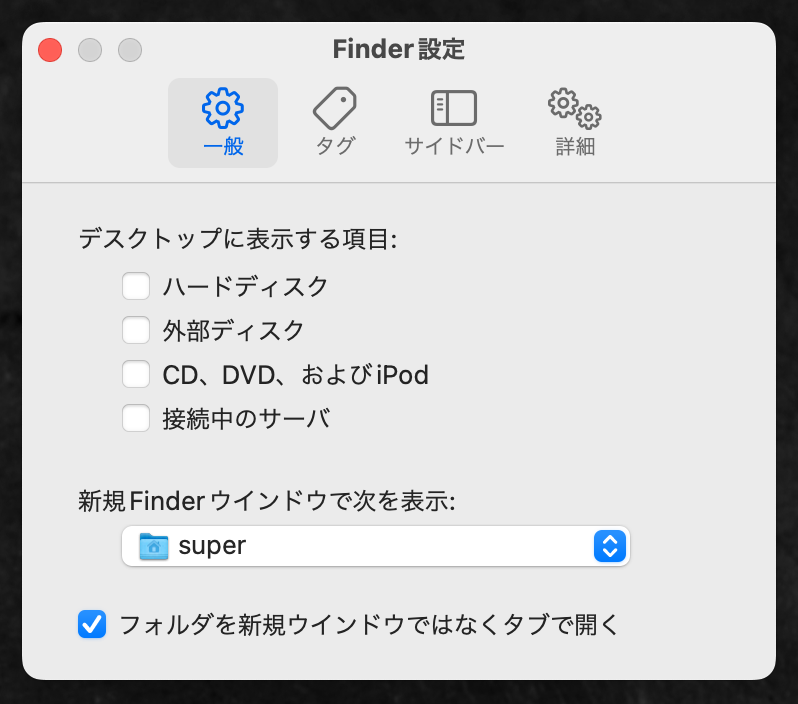
By default, when you connect an SD card, external drive, iPhone, etc., to your Mac, an icon (shortcut) for that drive appears on the desktop.
Additionally, when installing apps on a Mac, you often download and install .dmg files. Since .dmg files are recognized as disk images, unnecessary shortcut icons accumulate on the desktop each time you open a .dmg file.
Even if you keep an external SSD connected at home, you’ll access the files on the SSD through Finder anyway, so having the SSD icon constantly displayed on the desktop is redundant and distracting.
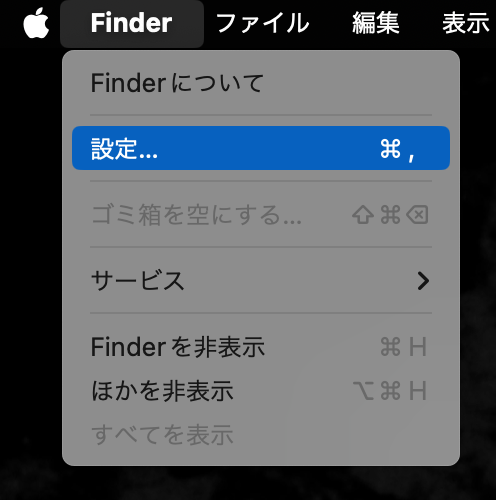
To alleviate such frustrations, I recommend opening Finder’s preferences from the menu in the top-left corner while a Finder window is open, and unchecking all items under “Show these items on the desktop” in the “General” tab.
Customize the Items Displayed in the Sidebar

You can customize the items displayed in Finder’s sidebar to your liking.
In my case, I don’t use Mac’s Music, Videos, or Pictures folders, so I uncheck them to save display space.
On the other hand, I frequently use AirDrop to send and receive files between my iPhone, as well as the Desktop, Documents, and Downloads folders, so I keep them always visible in the sidebar.
If you use cloud storage services like Google Drive or Dropbox, it’s a good idea to add shortcuts to those drives in the sidebar.
Incidentally, I use a cloud storage app called pCloud Drive.
Minor Finder Information That’s Convenient to Display
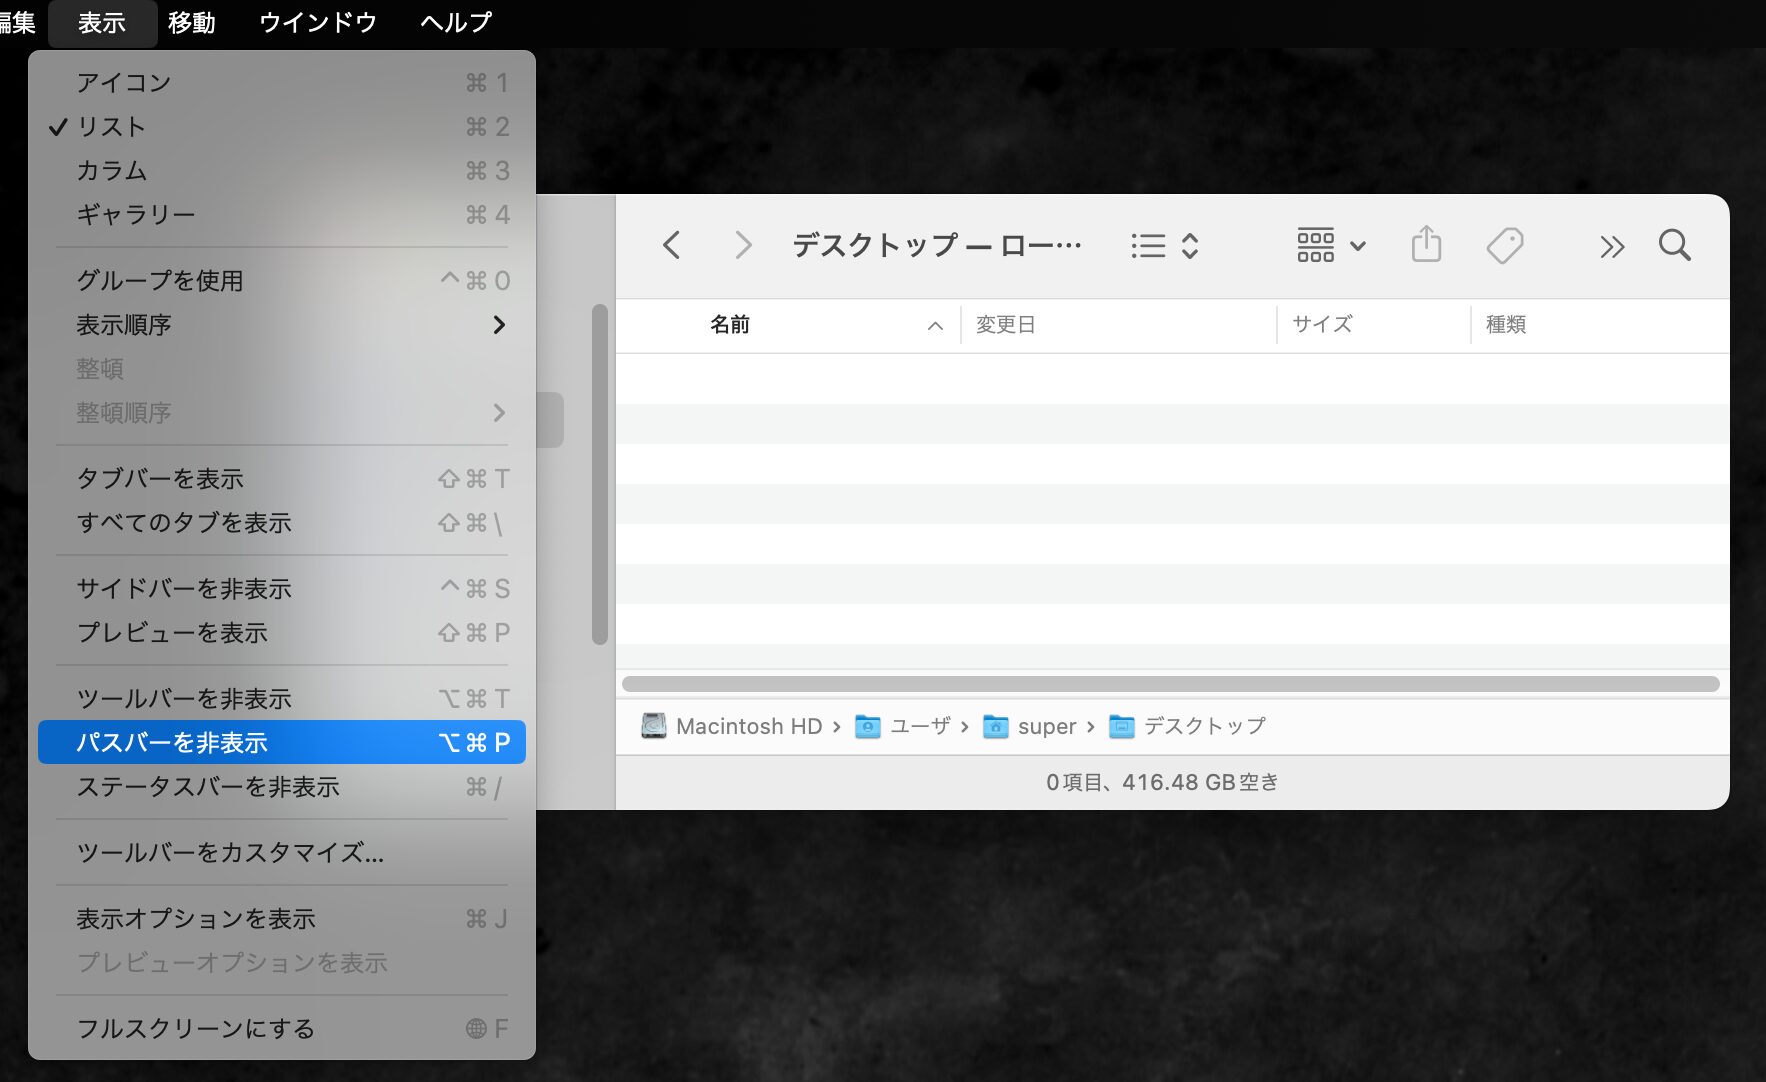
While they may not be the most well-known features, Finder includes a “Path Bar” that shows at a glance which folder hierarchy you currently have open, and a “Status Bar” that displays the available space on your disk.
These display areas are not shown by default, so I recommend enabling them from the “View” menu in Finder.
Displaying the “Path Bar” is convenient when organizing documents into folders, as it allows you to see the path and instantly jump to higher-level folders by clicking on them.
With the “Status Bar,” you can always check your available space, which is useful for storage management if you purchased a model with limited capacity, such as the 256GB MacBook Air/Pro.
Don’t Allow CapsLock! Keyboard Customizations You Absolutely Should Do
Whether on Windows or Mac, CapsLock is probably the most useless key on the keyboard.
Not only on the built-in keyboard of MacBook Air/Pro, but also when using an external keyboard, let’s disable CapsLock and assign a more useful key instead.
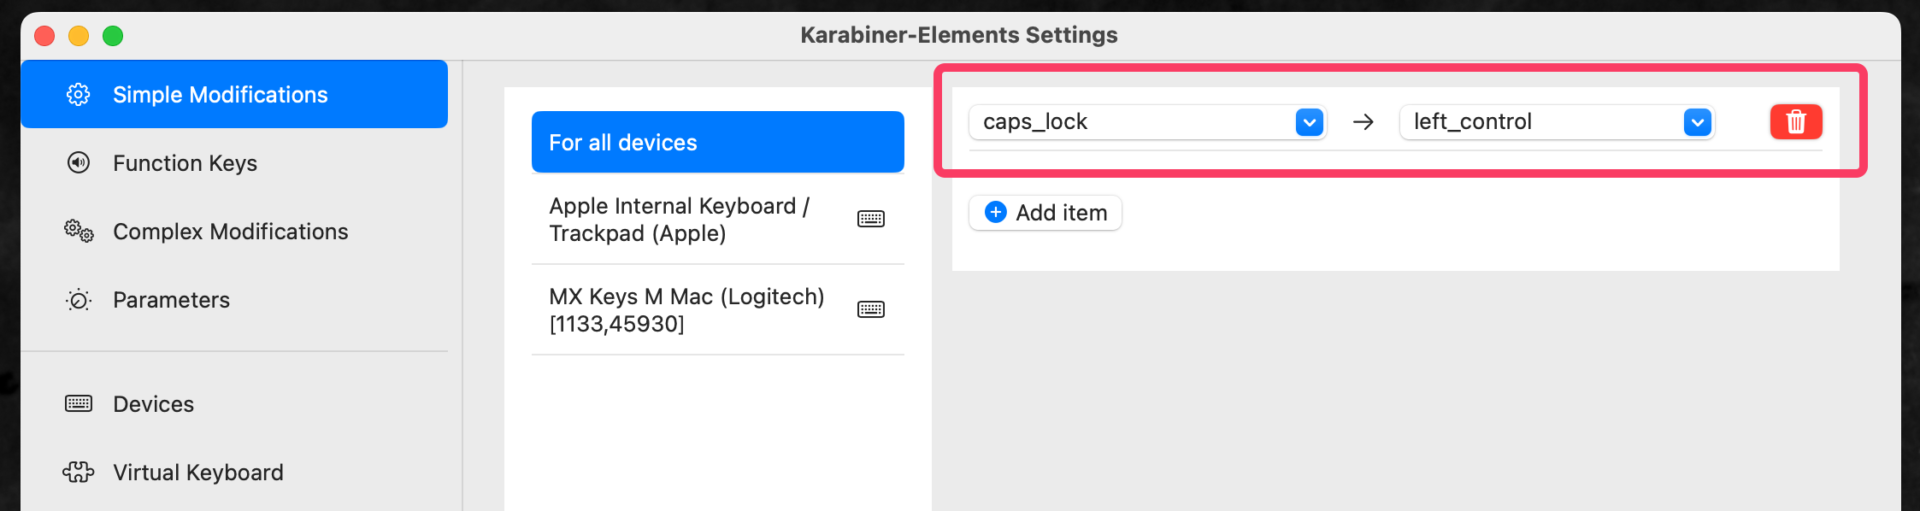
Although it’s possible to change the key assignments for CapsLock and other keys on the Mac’s Settings app, the app “Karabiner Elements” that allows for more flexible settings is an essential tool for Mac users.
With Karabiner, you can change key assignments for different devices such as the built-in keyboard and external keyboards, and flexibly configure settings such as changing specific function keys to other keys.
It’s much more convenient than using the Mac’s Settings app, so I recommend using this app.
You can choose which keys you want to remap according to your preferences, but personally, I change the CapsLock key to the left control key for all devices, as shown below.
On Mac, you can move the cursor while typing using keyboard shortcuts like “control + F” and “control + B”.
Using these keyboard shortcuts, you can move the cursor, delete, backspace, etc. without ever moving your fingers from the home position, further contributing to fatigue reduction.
By remapping the CapsLock key to left control, you can invoke these shortcuts by pressing CapsLock with your left pinky finger, which is very convenient.
The Voice Input Trick for Lightning-Fast Typing
Many people may not have used it, but Mac has a voice input feature that allows you to easily invoke voice input mode with a keyboard shortcut.
By utilizing this, you can have an innovative writing experience where the content you speak is instantly typed out when writing long texts.
Moreover, you can very smoothly switch between voice input mode and normal text input mode with the keyboard.
For example, you can input text for one paragraph using the microphone, and then switch to the keyboard for the next paragraph that contains complex words, allowing you to flexibly alternate input methods without interrupting your work and focus on writing.
The recommended setting is to turn on “Dictation” under the “Keyboard” section of Mac’s Settings, and set double-clicking the right command key as the shortcut to invoke voice input mode.
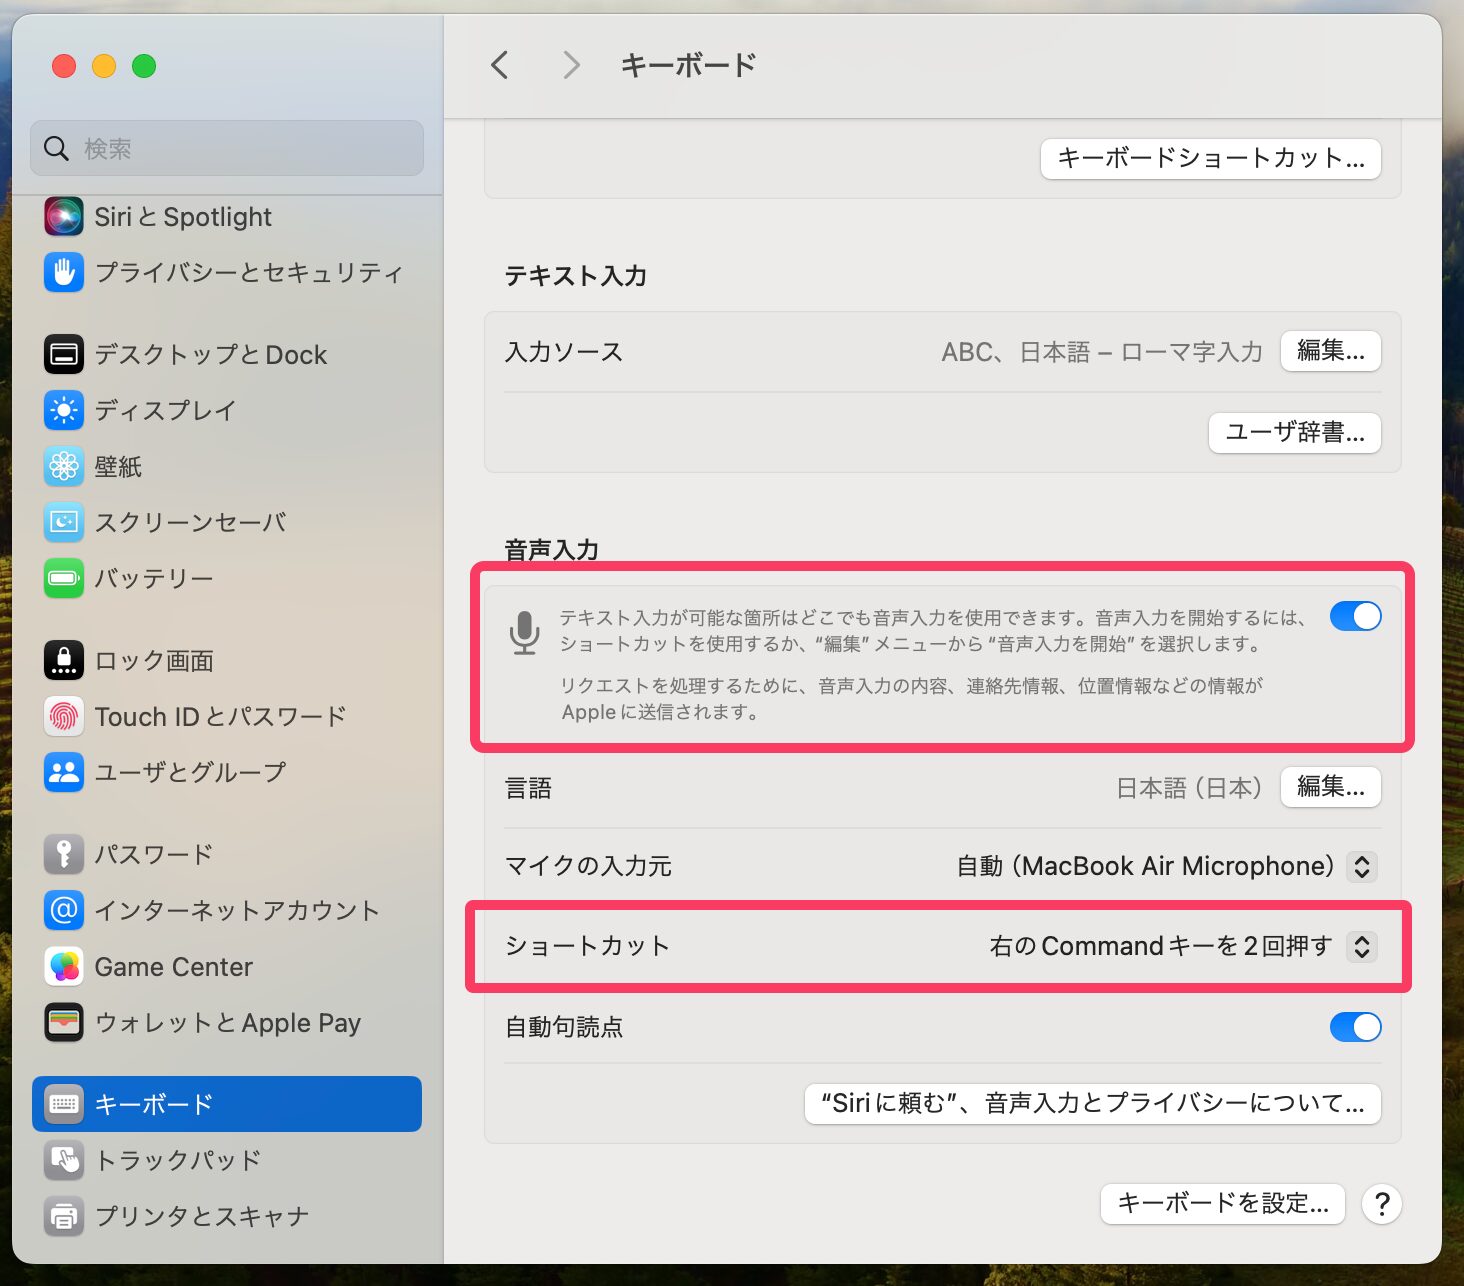
This way, when writing a long paragraph that is tedious to type, you can quickly double-tap the right command key and immediately start speaking to perform voice input, which is very convenient.
Clean Up the Menu Bar! Solving the Problem of Icons Hidden by the Notch
The MacBook series such as MacBook Air and MacBook Pro have an area called the notch where the built-in camera is installed, creating a blank space in the center of the top of the display.
As you add various apps, the icons in the menu bar increase, causing the problem of icons being hidden under the notch.
Even for those who don’t have so many apps that the icons get hidden by the notch, it’s stressful when the icons of resident apps that clearly don’t need to be displayed all the time accumulate in the top right menu bar.
The app “Hidden Bar” allows you to select which icons to display and which not to display, narrowing down the information that really needs to be shown at all times.
In addition to being able to freely rearrange the display order of icons, you can create an area that is always displayed and an area that is only displayed when you click the “<” arrow icon.
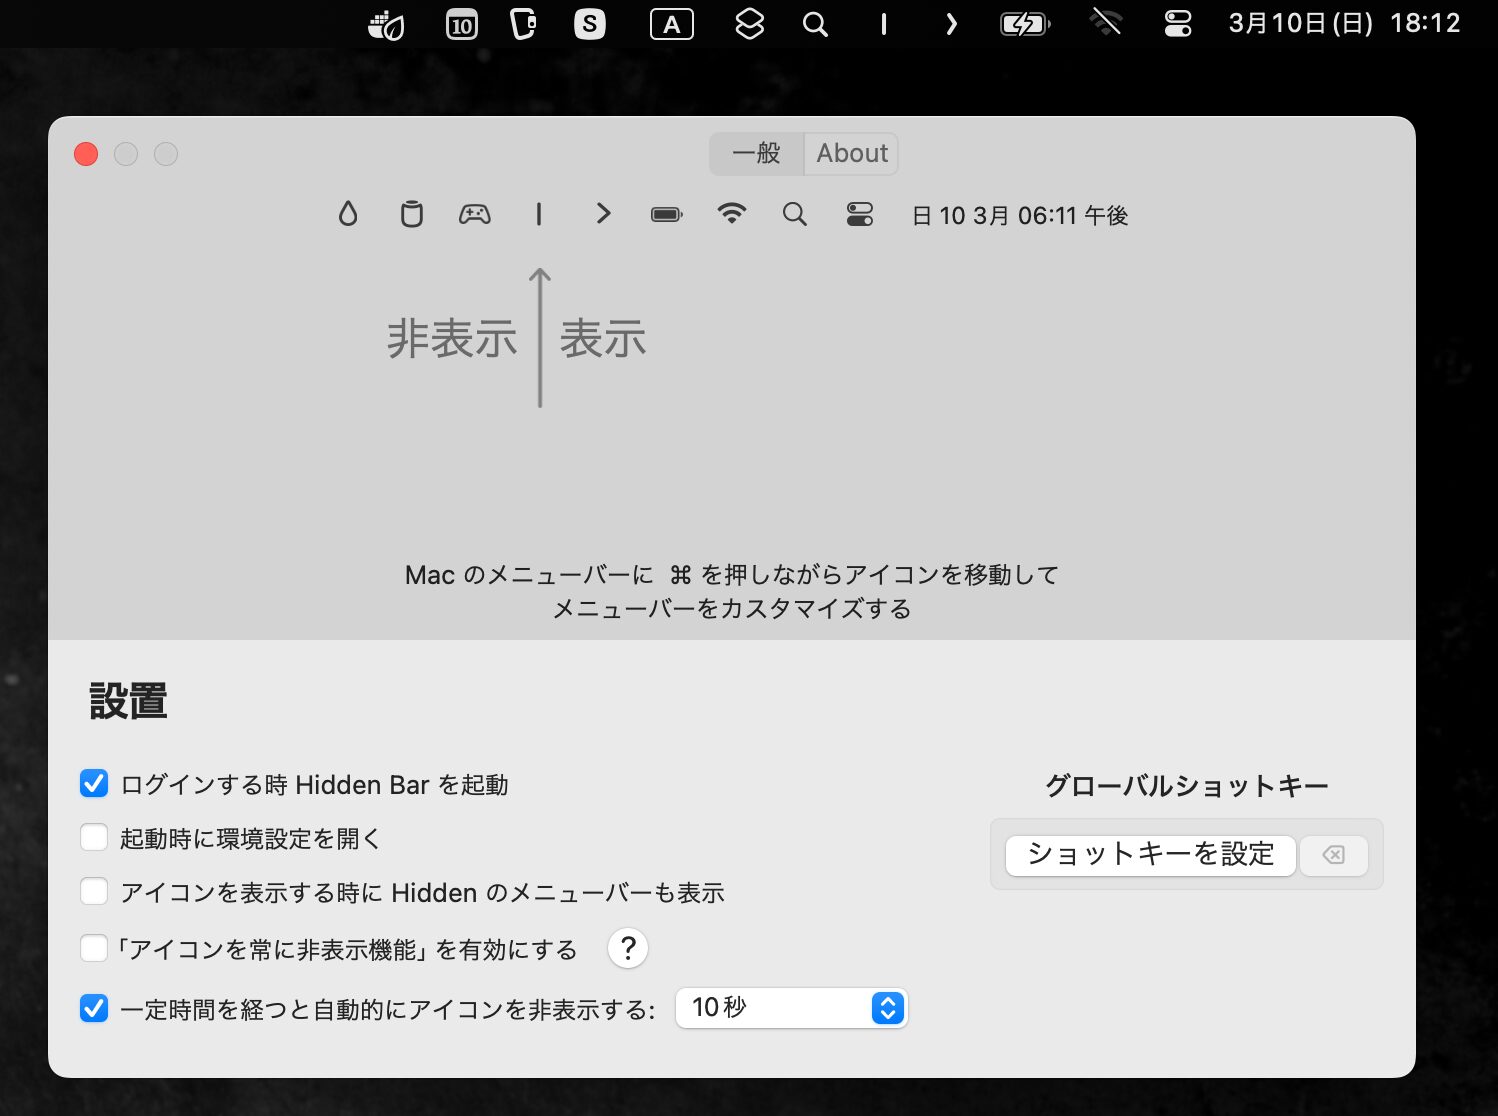
For example, I have it set up so that only the battery level, Wi-Fi, settings, and date/time are displayed.
It eliminates useless icons that are rarely used, improving aesthetics and also solving the problem of icons being hidden by the notch.

Also, by appropriately rearranging the hidden icons and placing the icons of frequently used apps as far to the right as possible, even if some app icons are hidden by the notch when Hidden Bar is expanded, you can maintain access to the essential icons.
In my case, I place the icons of cloud storage services like Google Drive on the right side of the hidden area, as I sometimes want to access them.
Remove Unnecessary Formatting from Copied Text
When copying text from websites and pasting it into applications like Word, it can be very annoying to have the original font and background color also copied over, requiring you to manually revert the formatting for each paste.
Unfortunately, there is no built-in setting in Mac to enable copying and pasting plain text only. You need to install a free app to achieve this.
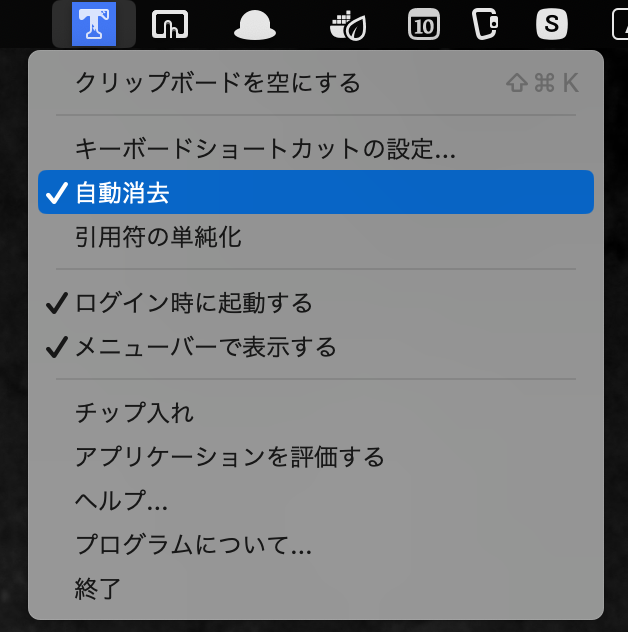
By installing the app “Get Plain Text” and checking the “Auto Erase” option in the formatting settings, you can paste copied text as plain text with the formatting removed.
If you want to copy the formatting along with the text, you can simply turn off the “Auto Erase” setting, so there’s no inconvenience.
Achieve Complete Uninstallation of Unwanted Apps
Normally, on macOS, dragging an app to the Trash is considered uninstalling it, but related files are left behind.
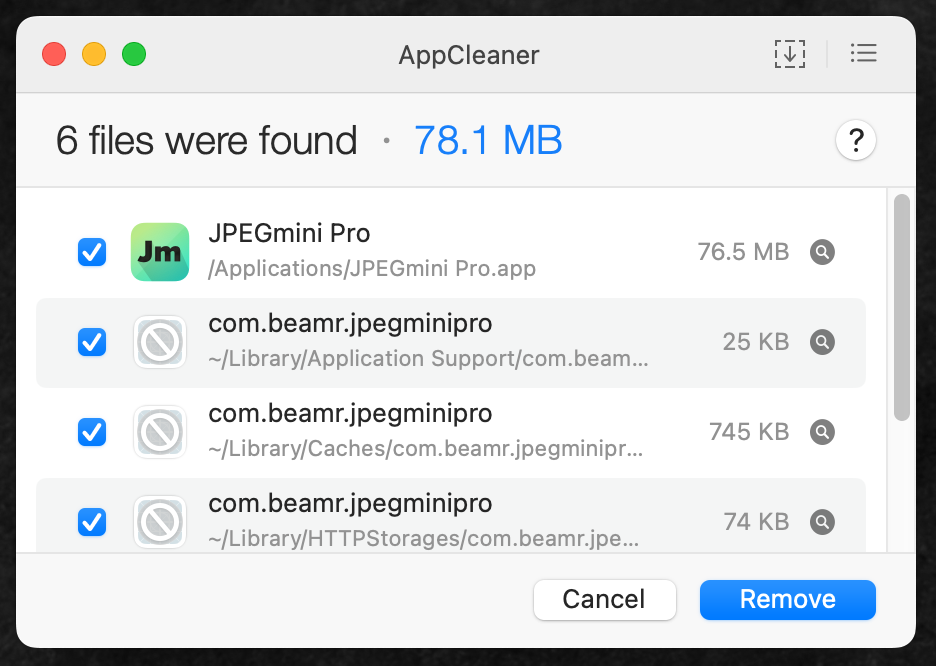
“AppCleaner” is a well-known app for completely uninstalling applications on macOS.
It can detect and remove all files related to an application (configuration files, caches, library files, etc.) together.
Moreover, you can easily uninstall an app by simply dragging and dropping it onto the AppCleaner window.
If you install various apps from the web in addition to the Mac App Store, it becomes difficult to keep track of the uninstallation method for each app. The easiest way is to have AppCleaner installed and throw any unwanted apps into it.
Enhance the Convenience of Compressed Files like Zip
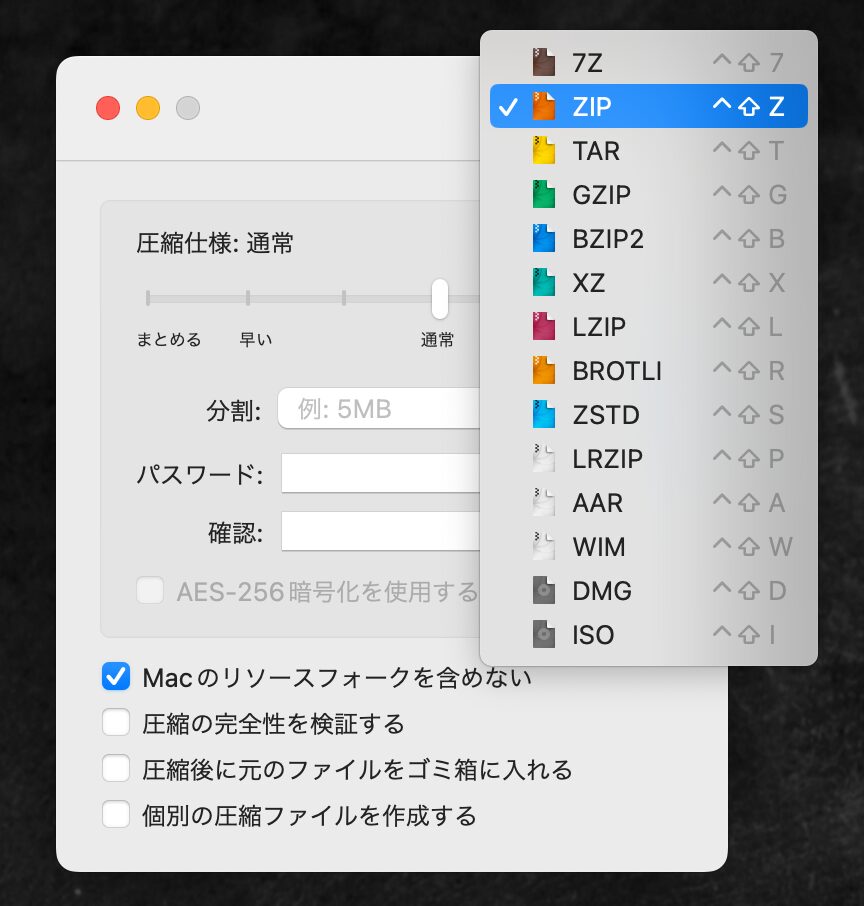
macOS has a built-in archiver that allows you to compress and extract zip files by default, but it lacks features like password-protecting zip files or compressing large files into multiple parts.
“Keka” is an open-source file archiver app for macOS that comes with a full set of essential features.
It is sold as a paid app on the Mac App Store, but being open-source software, it can be obtained for free from the official website.
If you use a Mac and frequently work with zip compressed files for work or other purposes, it’s a must-have.
Additionally, it supports a wide range of archive formats, allowing you to compress and extract files in various formats such as ZIP, 7z, TAR, GZIP, BZIP2, and more.
Just the ability to password-protect and split .zip files is quite useful, so it’s definitely worth installing.
Paid but Must-Have! Better Touch Tool
“BetterTouchTool” is an app that further enhances the already powerful gesture functions of Mac’s trackpad.
It is an essential app, especially for Mac Book Air / Pro users who heavily use the trackpad, and can be considered one of the classic and well-known paid applications.
Additionally, BetterTouchTool comes with a bonus feature that allows window resizing like Windows, which is also an essential function.
The app is not too expensive, with a 2-year renewal plan for $10 and a lifetime plan for $22, so if you’ve just bought a Mac, it’s highly recommended to get it.
Set Gestures for Trackpad and Mouse
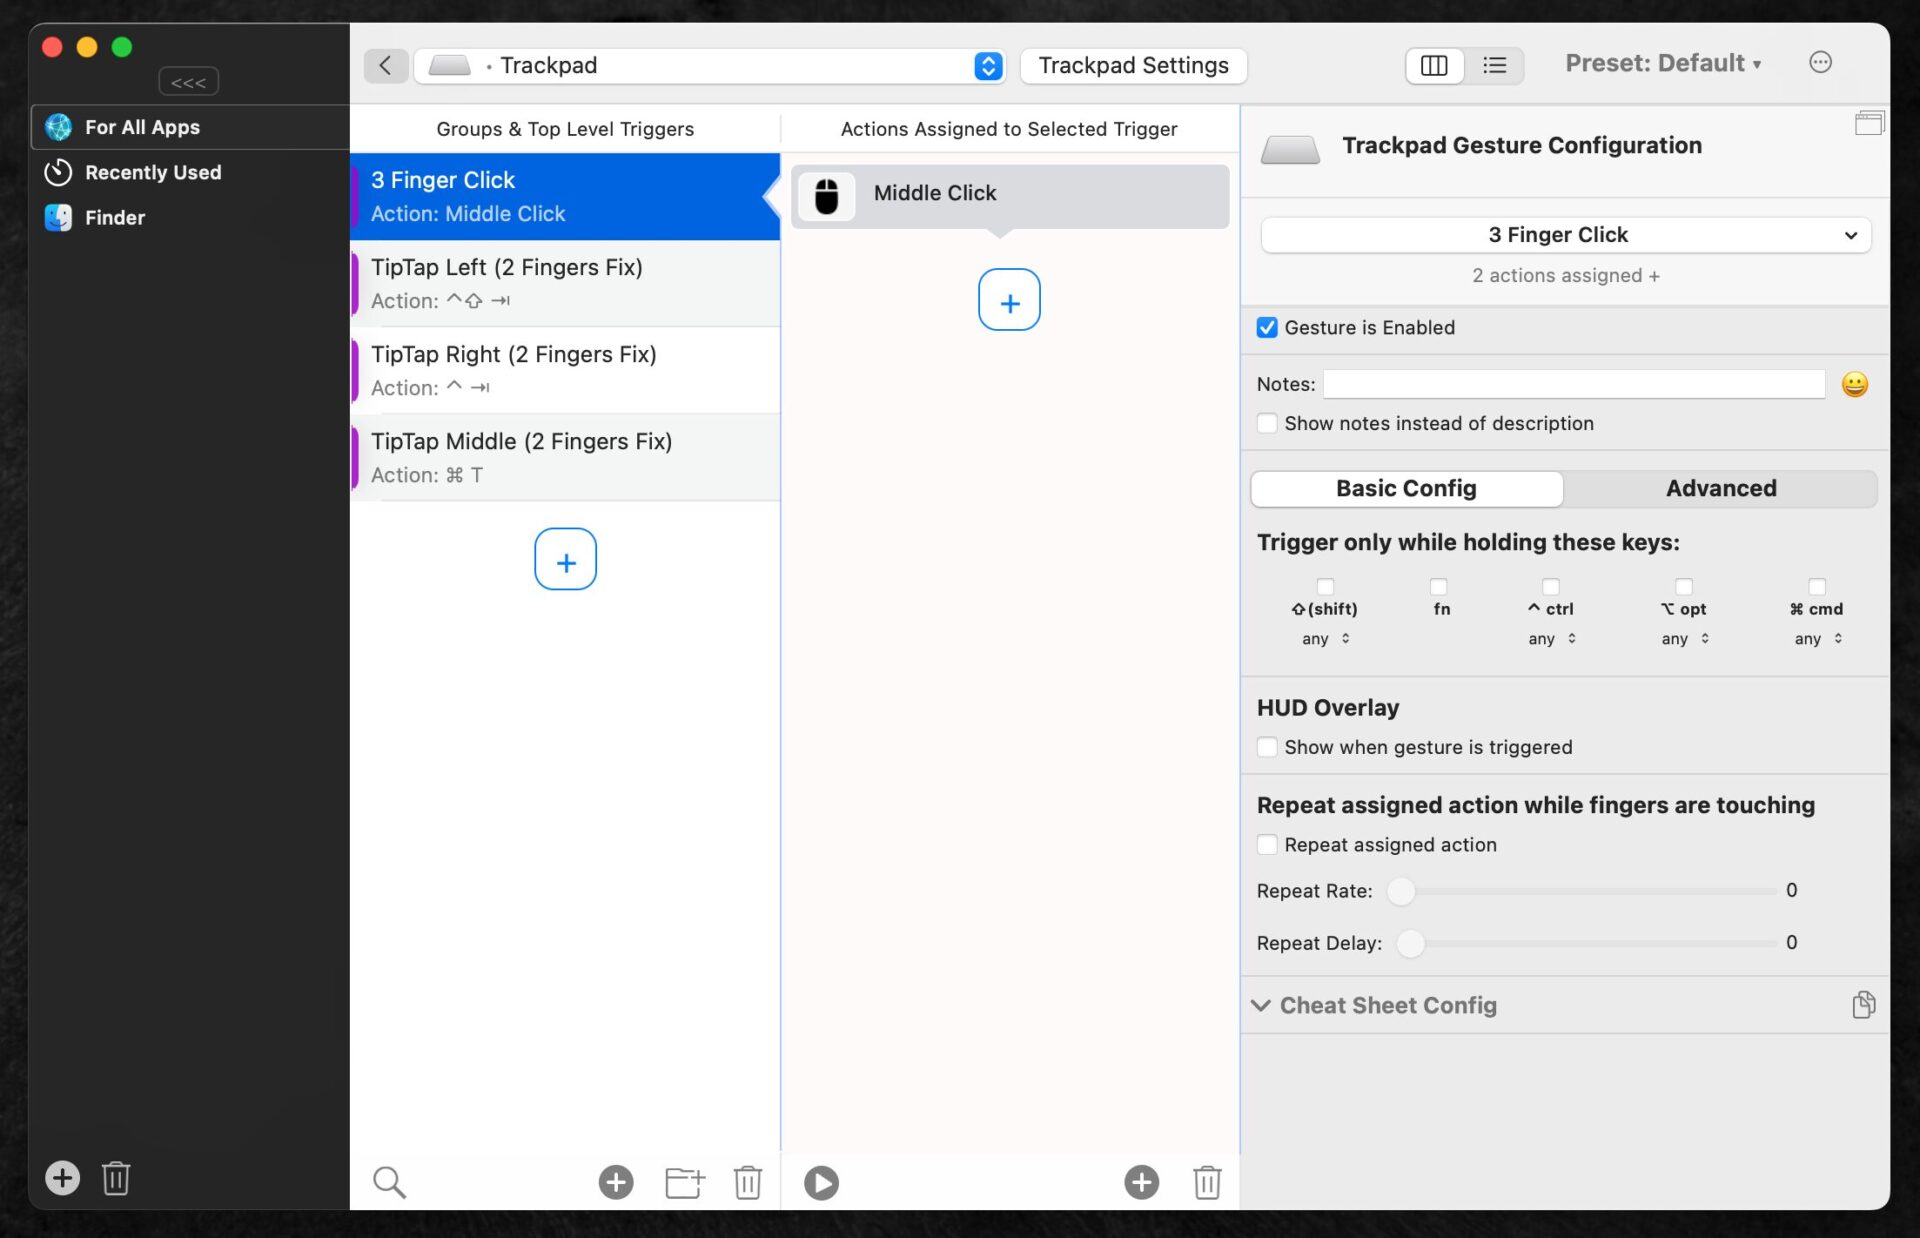
With “BetterTouchTool”, you can assign shortcuts to input devices such as mouse, trackpad, Touch Bar, and keyboard, greatly expanding the limited gestures of Apple’s default settings.
You can freely set the combination of triggers (gestures, etc.) and actions (commands to launch, etc.), so for example, you can revive gestures that were discontinued in macOS, such as launching Mission Control with a three-finger swipe.
For instance, I have set it so that clicking the trackpad with three fingers is the same as clicking the middle button of the mouse, and when I TipTap (fixing two of the three fingers and moving left, middle, or right), I can use the browser’s back, new tab, and forward functions.
This allows me to easily call up frequently used functions while minimizing finger and wrist movements, which is very convenient.
Also, the configuration files can be shared, so you can import and imitate other users’ recommended settings found on the web.
Essential Windows-like Feature: Window Snapping on Mac
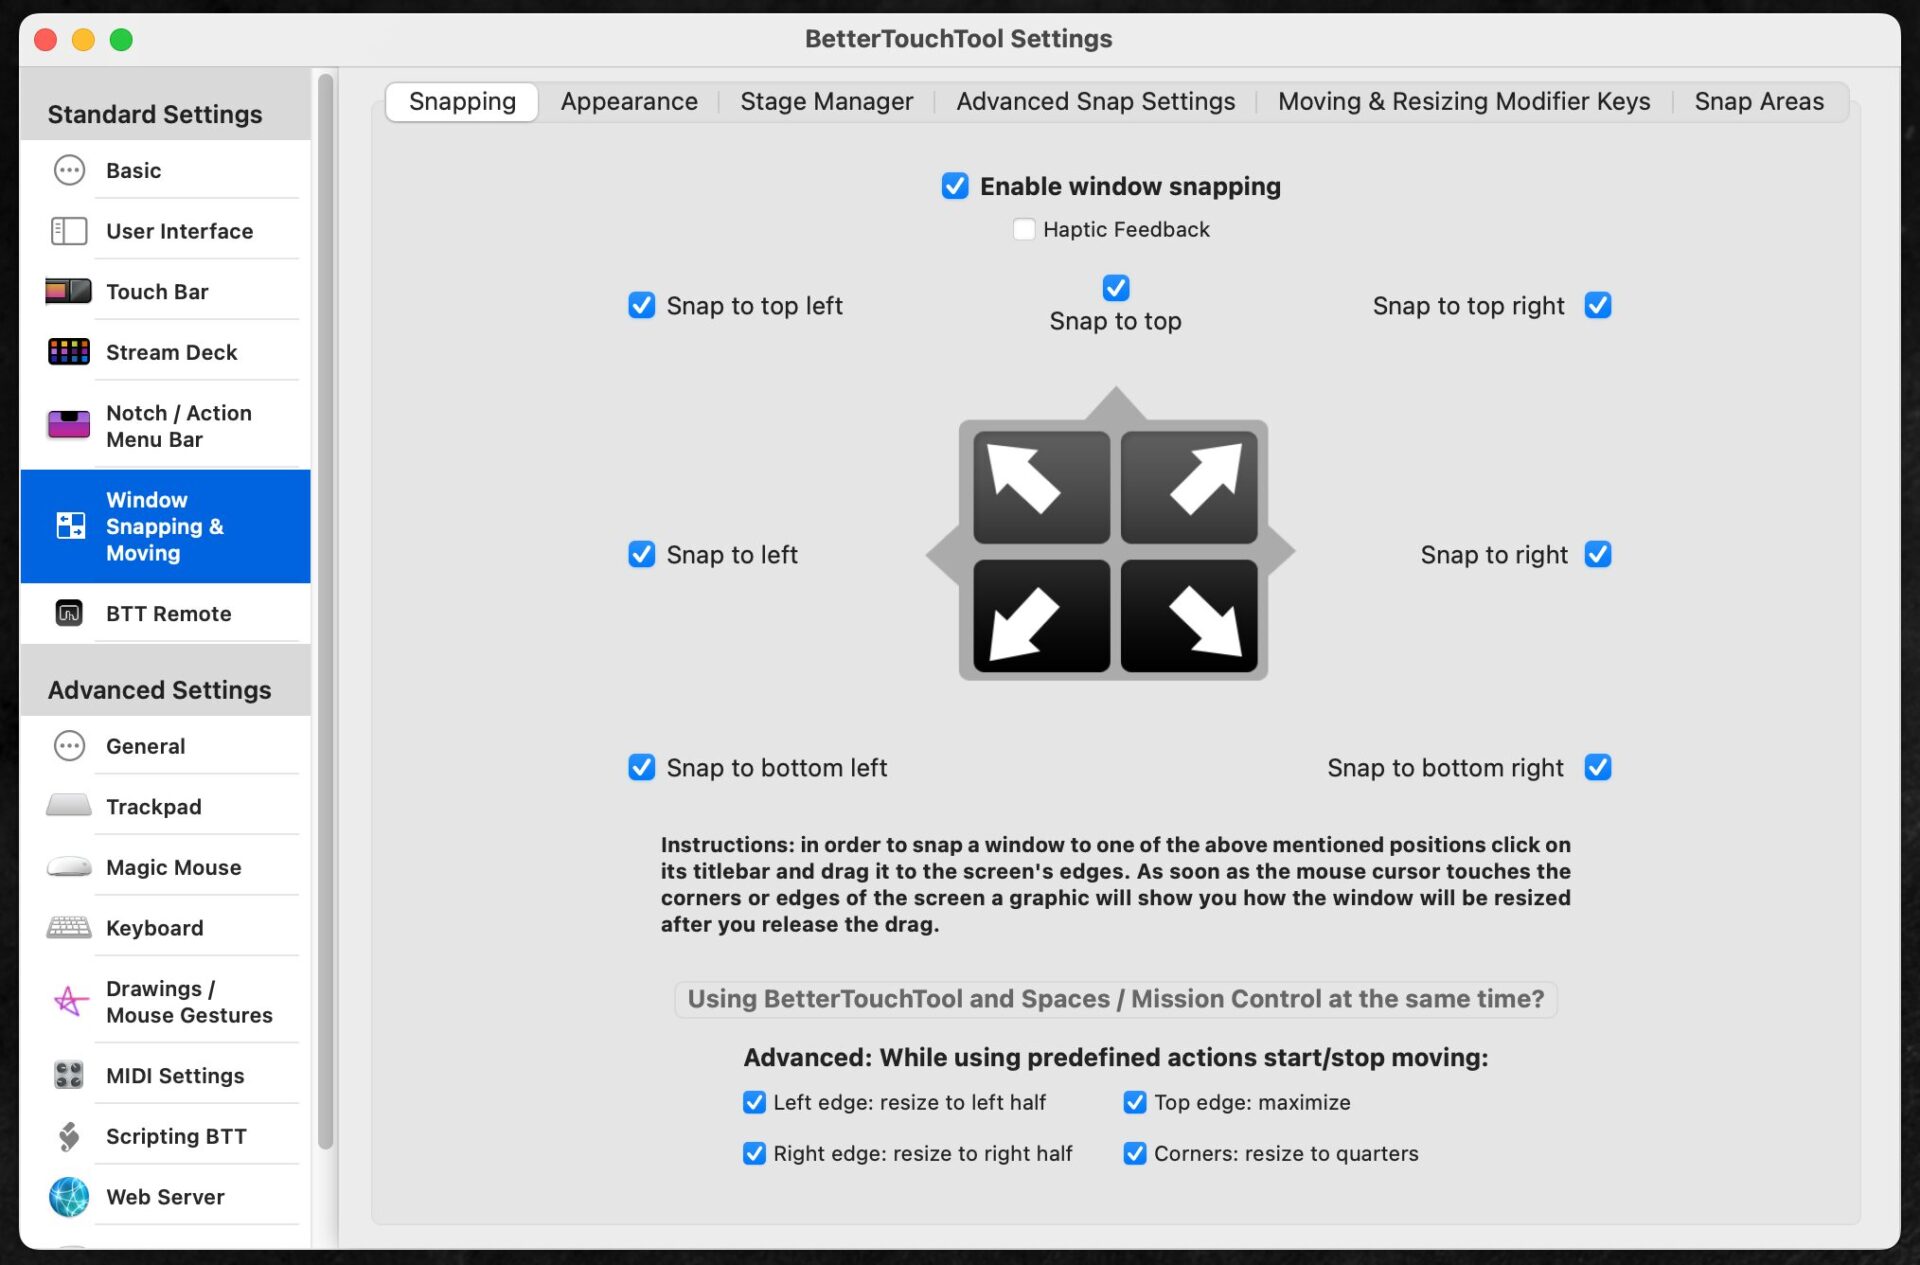
BetterTouchTool includes a feature similar to Windows’ window snapping, which is a nice addition to the trackpad gesture customization.
Window snapping is a feature that allows you to easily resize and align windows by simply dragging them to the edge of the screen.
For example, dragging a window to the left or right edge of the screen automatically resizes the window to half the screen size. Dragging a window to the top edge maximizes it.
You can also customize the snap areas to position windows at your preferred locations and sizes.
While this feature is available by default on Windows PCs, unfortunately it is not included by default on Macs, so you need to install third-party apps like BetterTouchTool.
Paid but Must-Have! Alfred 5
On Mac, clicking Command + Space brings up “Spotlight Search”.
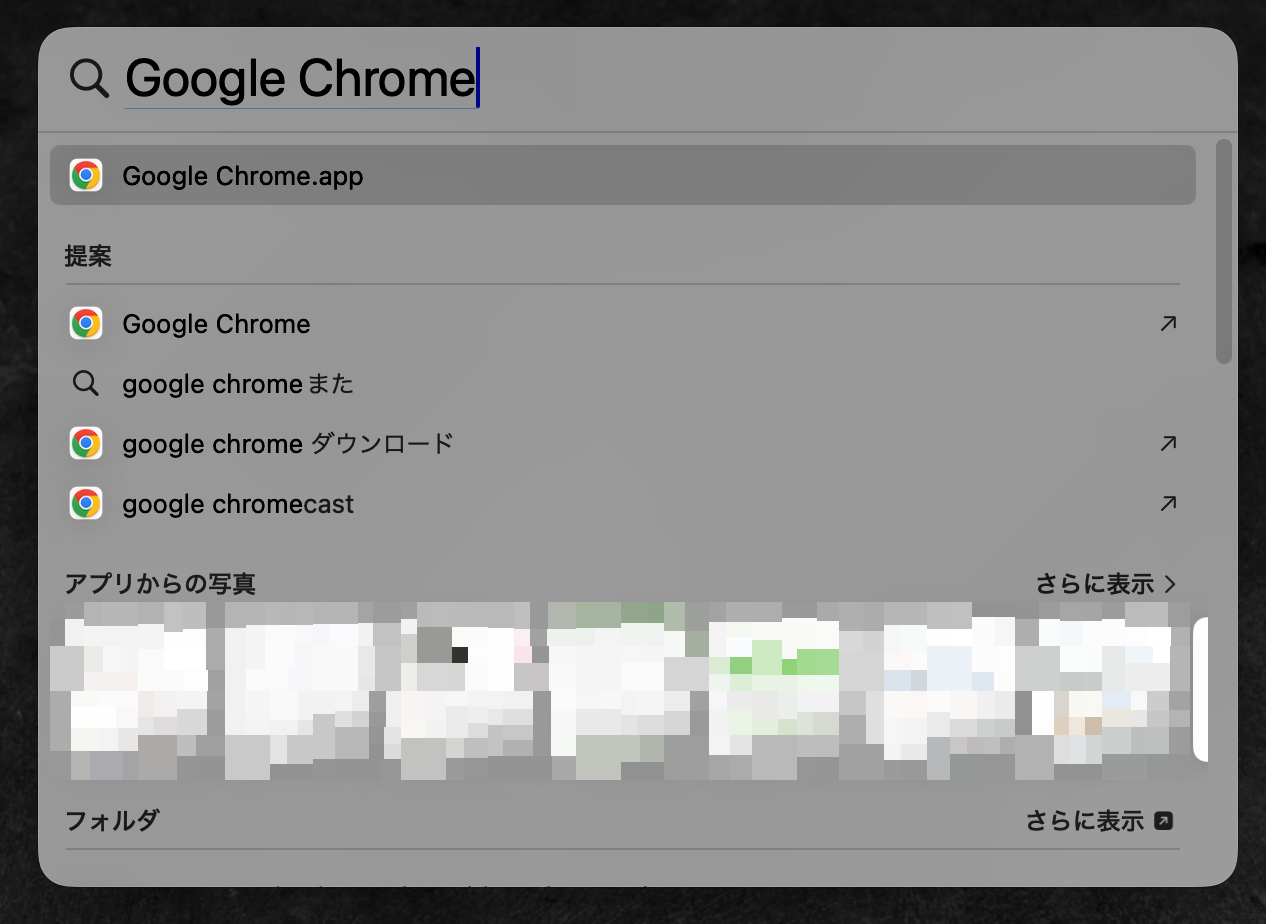
Spotlight Search serves as a basic built-in simple launcher, with minimal features such as searching for files on your Mac and launching apps by typing the app name and hitting enter.
As the number of frequently used apps increases, it becomes cumbersome to open Launch Pad and look for app icons every time, so being able to instantly type and launch app names while typing text on the keyboard is very convenient.
“Alfred 5” further enhances such launcher functions.
This can also be said to be the classic of classics among Mac apps, along with BetterTouchTool.
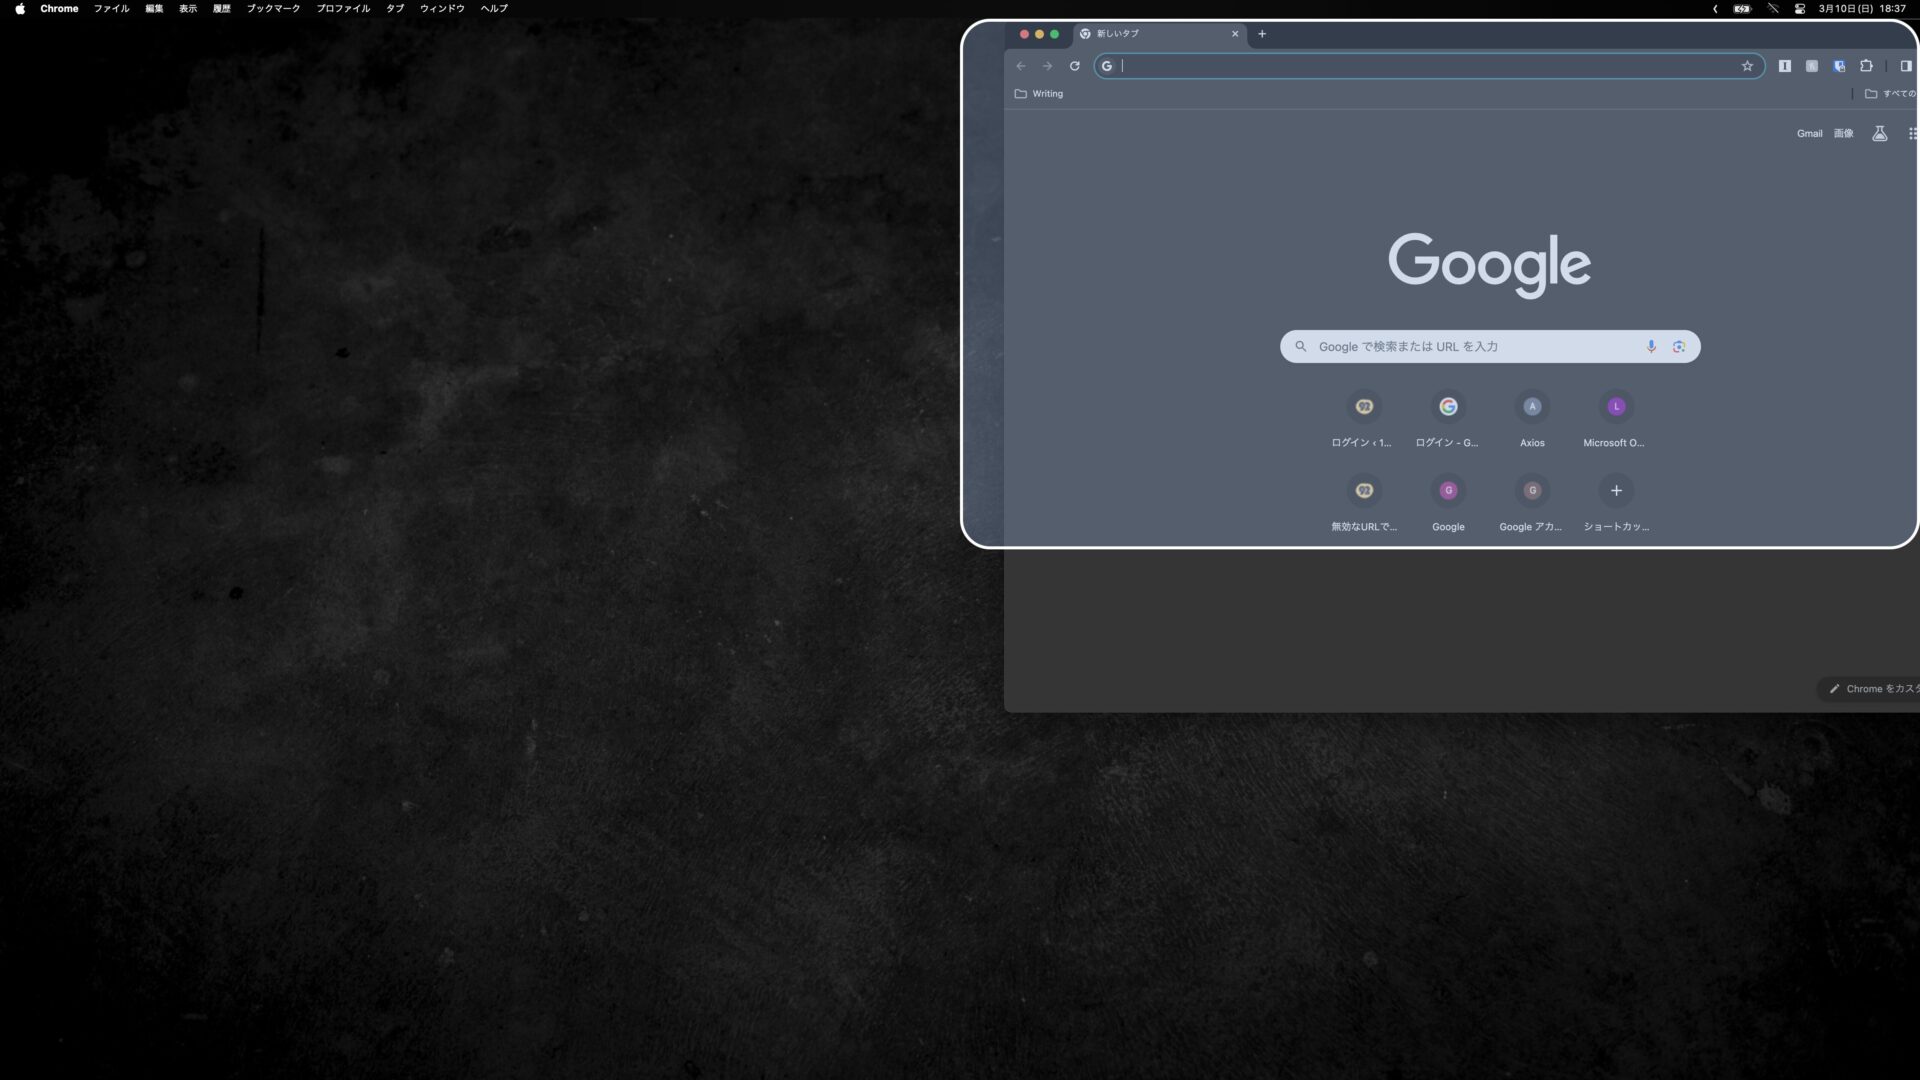
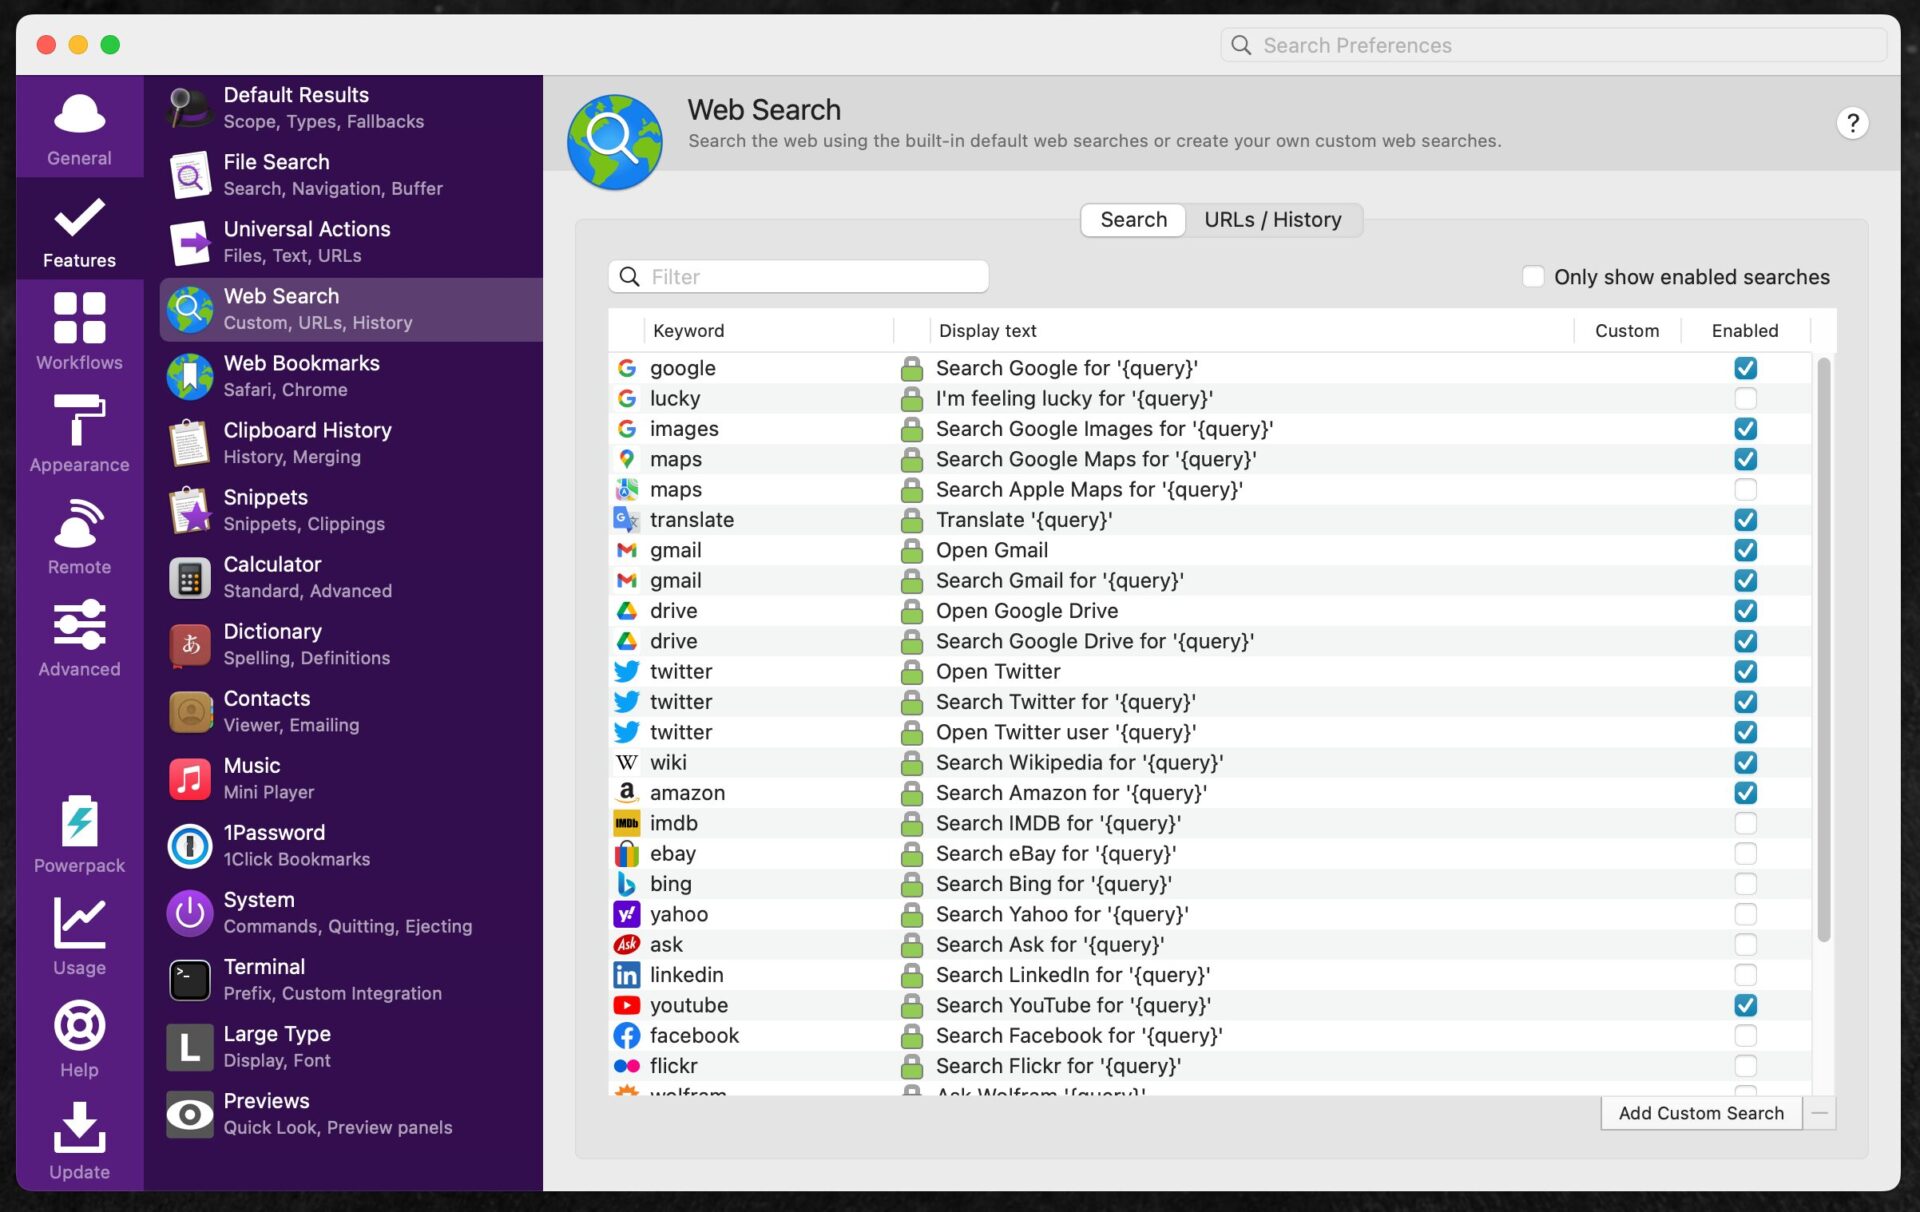
Alfred has many additional features that Spotlight lacks, such as web search, calculation, spell check, and system commands.
For example, typing “Google” at the beginning allows you to instantly Google search the following words in your browser.

These search destinations can be customized in the settings, so typing “drive keyword” searches for files on Google Drive, and typing “maps keyword” instantly searches Google Maps for that keyword.
I use Google Workspace for work, so being able to search Gmail and Google Drive from anywhere with keyboard shortcuts is extremely convenient.
It also includes features like snippets and clipboard history, greatly improving the convenience of using a Mac.
With the snippet feature, you can set it to automatically convert “!date” to today’s date “20240328”, or instantly type frequently used boilerplate text in emails.
Furthermore, using the customization feature called Workflows, it is possible to ask ChatGPT questions directly from Alfred’s launcher, making the possibilities truly endless.
Initial Setup is Important to Unlock Mac’s Potential
To use a Mac comfortably, it is important to make settings tailored to each user.
In this article, from the perspective of a heavy user with over 10 years of Mac experience, I have explained the initial setup that should be done immediately after purchasing a Mac.
It covers everything from trackpad settings, keyboard customization, and Finder optimization to introducing must-have apps that should be included by default.
Even seemingly trivial settings can have a big impact on daily usability and significantly improve work efficiency, so please refer to them.
While I think macOS is a highly functional and polished OS, it lacks some basic features that are standard in Windows, such as window snapping, so it would be a waste to continue using it with default settings.
By using the settings introduced in this article as a reference and applying your own customizations, you can have a more comfortable and productive Mac life.
These recommended settings, born from years of experience, should be useful for a wide range of users, from beginners who have just purchased a Mac to intermediate users. They are based on my personal preferences, so please use them as a hint to find your own preferred settings.